Step
Action
1
Select the Create Group icon.

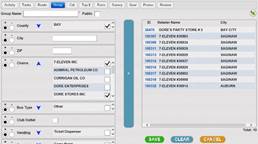
Result: The Create Group page is displayed

Note: All retailers assigned to the sales rep are selected by default. As filters are applied, retailers are removed.
2
In the New Group Name Field, enter a unique name for your group.
![]()
Optional: Check the Public Check
box to make this group available to all sales reps.![]()
3
Begin using filters on the left hand side of Create Group page to create desired group.
NOTE: The
![]() indicates the field is
a multi-select checkbox option list.
indicates the field is
a multi-select checkbox option list.
Filter options:
Option |
Description/Directions |
Plus/Minus Radio
Button
|
The radio button defaults to “+” indicating to include items selected in the filter. Selecting the “-“radio button will result in specified filter items being excluded from list. |
County |
Click the arrow to display country list and select counties to include or exclude. |
City |
Type in the city for which you wish to include or exclude. |
Zip |
Type in the zip code for which you wish to include or exclude. |
Chails |
Click the arrow to display the chains list and select the chains you wish include or exclude. |
Bus Type |
Click the arrow to display the business types list and select the types you wish to include or exclude. |
Club Outlet |
Select the check box if you want to specifically include or exclude Club Outlets. |
Vending |
Click the arrow to display the vending list and select vending types you wish to include or exclude. |
Terminals |
Click the arrow to display the terminals list and select the terminal types you wish to include or exclude. |
Multi Term |
Select the check box if you want to specifically include or exclude Multi Term retailers. |
Products |
Click the arrow to display the list of products and select the product types you wish to include or exclude. |
4
Once you are satisfied with your filter selections, click the blue arrow icon in the center of the Create Group screen to apply filter selections.

Result: Filters applied and filtered retailers list displayed on right hand side of Create Group screen.

5
To save the Group click the Save Button.
Note: To reset all filters and start again, click the Clear Button. To cancel the group setup click the Cancel Button.
Result: The group is created and displayed on the Field Group page.
